
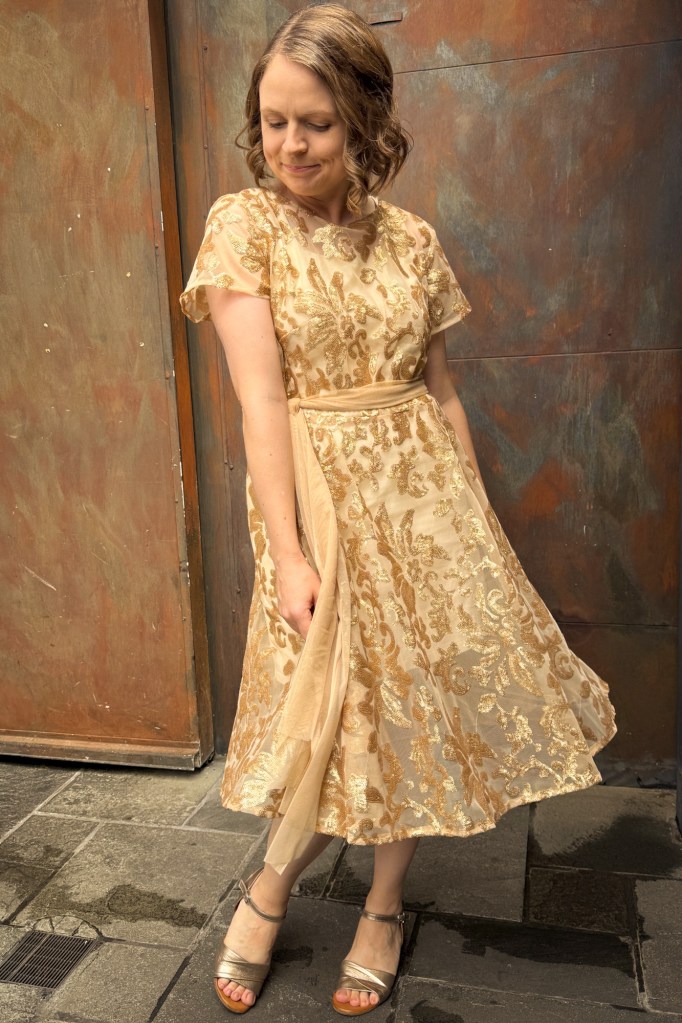
So I may have done something completely idiotic, and decided to sew a dress for our 10 year anniversary party just a little over a week before the event.
Not only did I leave it until the last minute (and those of you who have young kids at home will know just how little time we have available for sewing projects!), I also decided that I wanted it to be both sheer and sparkly to jazz up a cute but slightly plain thrifted dress that I’d found at a pre-loved clothing shop. Why do I punish myself with such difficult tasks?
I’d actually come up with the original idea to sew an anniversary party dress many months ago, but I was going to use my wedding dress and remake it into a cocktail dress for the party. I’d attempted to sell the dress (because really, I’m not going to wear it again), but was unsuccessful in finding a buyer.
I saved a bunch of ideas for a wedding dress transformation on a Pinterest board and had a vague idea of how I wanted it to look, but when the time came, I just couldn’t make myself cut it up.
(A quick kudos to my Mum for doing the original alterations to my wedding dress, because I know that it would have taken a lot of bravery to take a pair of scissors to a gown that cost over a thousand dollars.)
So instead, I did what I do best – I went thrift shopping and found a classy underdress, and then I went to the fabric shop to find something sparkly. I have now created this cocktail frock that pays homage to my original wedding dress through the colour choices, but in a more jazzy style that I might dub ‘2025 cocktail chic’.

Supplies:
- Sequin tulle (purchased from Spotlight in Australia)
- Matching polyester thread
- Thrifted shift dress, for wearing underneath
Fabric requirements:
- Fabric length: I purchased 2 metres of fabric
- Fabric width: 120 cm + it had about 10cm of extra tulle (without sequins) along each edge
The design:
I knew that I wanted the sequin cocktail dress to be kind of sexy, but also not too revealing – a difficult balance.
For the sheer outer dress, I wanted the skirt to sit below the knee and the bodice to have a higher neckline and sleeves. I didn’t know if I could add a zipper to the tulle dress as it would be super visible underneath, so the dress pattern needed to allow me to slide the dress over my head and body without a fastening.
After some thought, I landed on the Sew Liberated Hinterland Dress bodice with an altered high neckline which I self-drafted. The muslin I made looked good, though I had to adjust the angle of the shoulders to be much flatter as they were way too steep (anyone else have that problem??).
For the skirt, I wasn’t sure whether to attempt a circle skirt or go with gathers. I ended up going with a self-drafted half circle skirt that finished below the knee (which for me was 64 cm in length). This was for a few reasons: first, because I thought a circle would look a bit more elegant than the gathers that are in the Hinterland pattern (I think if it were a regular day dress, gathers would have worked fine). Second, I only had about 130 cm of fabric for the skirt after cutting out my bodice and sleeve pieces, which was only just enough for a half-circle.
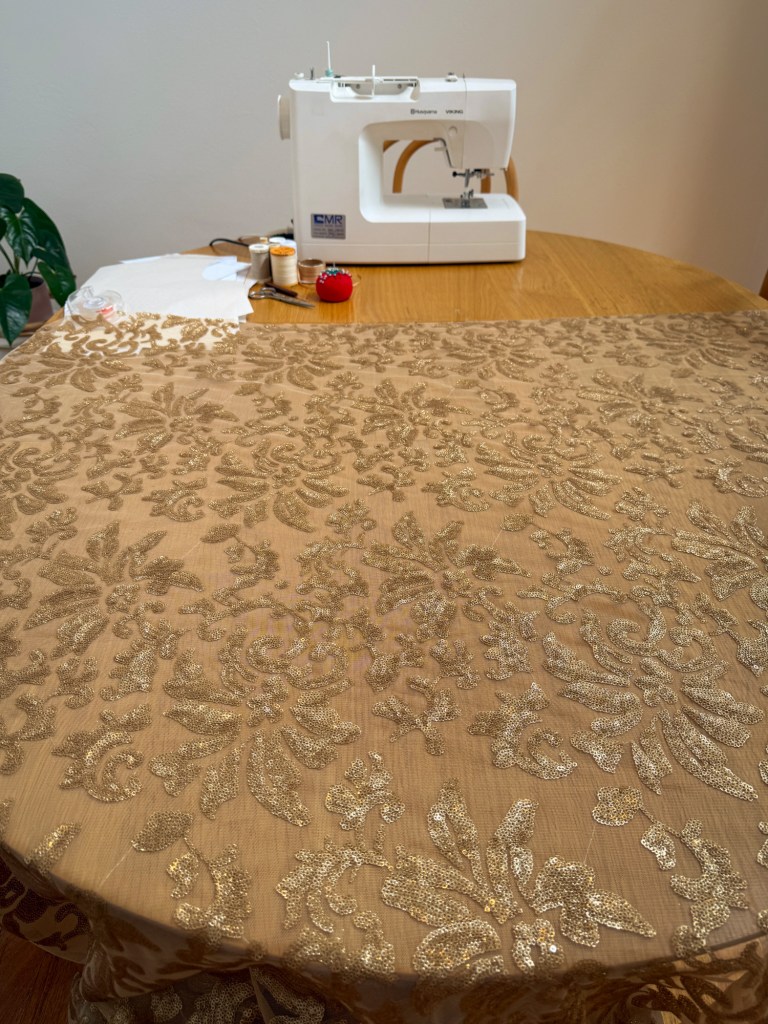
Sewing with tulle and sequins:
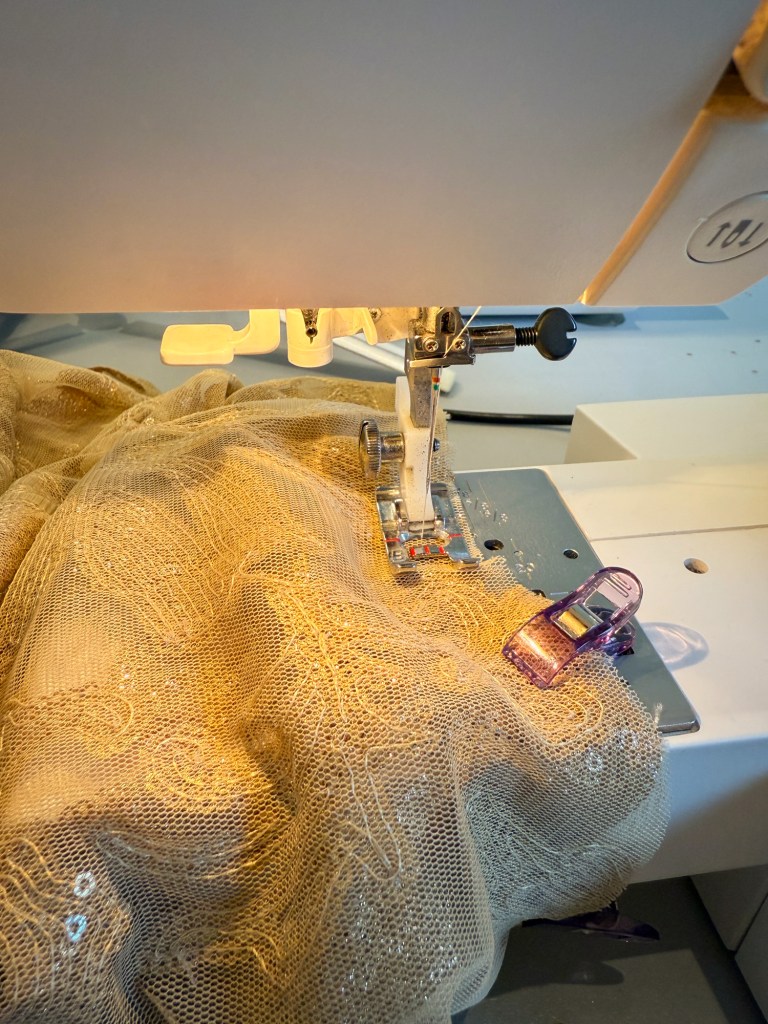
Sewing with tulle was something I had never attempted before, and sewing was sequins was also new to me, so this project was a bit scary! It turns out, tulle isn’t all that difficult to work with if you take it slow.
The main thing I didn’t know how to do was finish the seam allowances. You don’t have to overlock or zig zag the edge of tulle as it doesn’t fray, but I found that my seams didn’t sit flat or stay facing the direction that I wanted them to. You’re not really supposed to press tulle either (especially when it has sequins!) and I couldn’t find a good answer to my predicament on other sewing blogs, so I ended up just folding the seam allowance flat in the direction I wanted it to face, and then topstitching a few millimeters from the seam to hold it in place. I think this worked fine.
When it came to the neckline, I bound the edge with a spare piece of tulle that had no sequins on it.
I hemmed the sleeves and skirt with a regular narrow hem. For the seams and sleeve hems, I did make some attempts at taking off any sequins that I thought might be protruding or in a place where they’d make me feel itchy while wearing the dress (such as under the arms). This was very time consuming! But I have to say it was not uncomfortable to wear at the party, so I guess this extra effort did pay off.
The final adjustments
The thrifted dress that I had bought to wear underneath was originally midi-length, so I cut it to above-the-knee and re-hemmed.
Once I tried it all on, the swing style of the sequin tulle dress looked cute but on my specific body shape, I just felt like it needed to be cinched at the waist. To fix this, I made a matching waist tie from the selvedge tulle, which made 2 metre long strips 10 cm in width. Once these were tied on in a knot at the side front, it really shaped the dress better around my torso and emphasized the volume in the skirt.
This sequin tulle party dress really made me feel like I was dressed for a fancy occasion, which was exactly what I wanted. I think the style would have worked nicely if I were making a wedding guest dress as well. It really looked great. And I had the pleasure of telling people that I made the dress when they complimented me on my attire. Those of you who sew your own clothes know that there is no greater feeling!
Tips for sewing with sequined tulle:
Needle: As I learned while watching season 10 of The Great British Sewing Bee, sequins are notorious for breaking needles. I tried a size 10 jersey needle and a size 12 universal needle, and both of them broke when they got caught on particularly thick seams with multiple layers of sequins. The last needle I used was a size 14 universal, which didn’t break, but I can’t say that it would have been safe from breakage either! I don’t think that one needle ended up being better than the other – both needles seemed to get the job done – but be prepared that you might break a few in the process.
Thread: I used Gütermann polyester thread.
Stitch: I used a regular straight stitch with a 2.75 length. I’ve heard that some people use a slight zig zag with tulle to make the seams a little more supple, but seeing as I was making a loose fit swing dress, I didn’t bother with the zig zag.
Pins: It may be easier to use quilting clips than pins.
Pace: Take it slooooow.
Pressing: Don’t do it! Leave the dress in a steamy bathroom to relax the seams after completion. Alternatively, use a steamer. I held up my iron and gave it a few pumps of steam to relax the dress a bit before wearing it.

Leave a comment