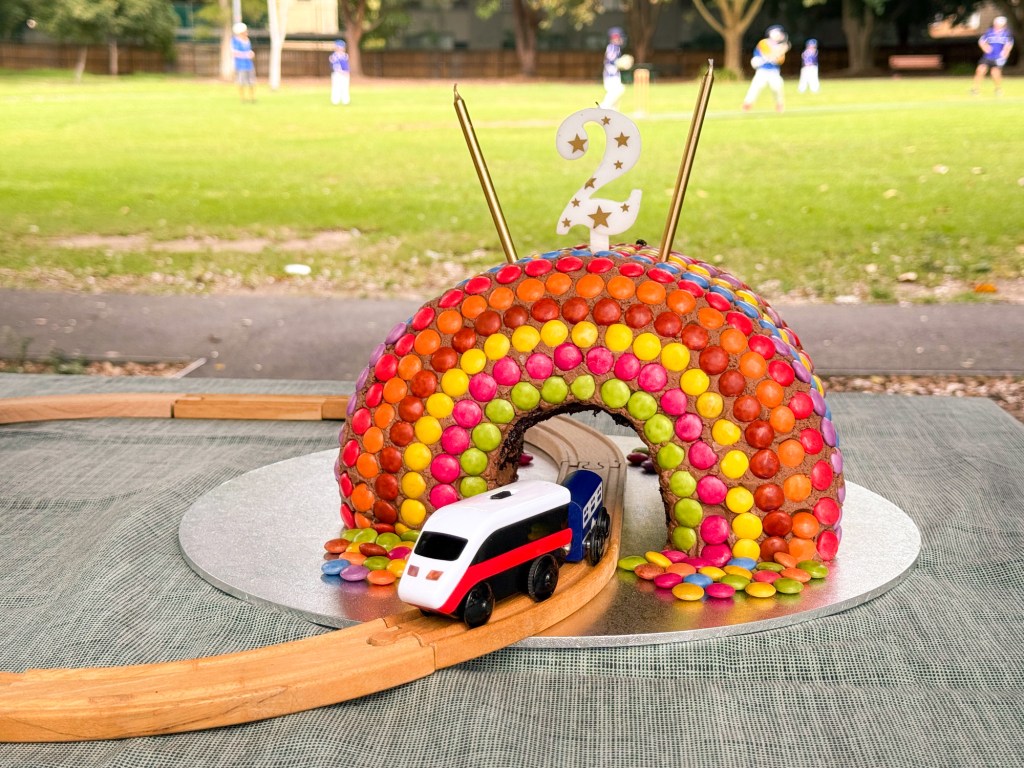
This is a little off topic for my usual sewing ideas, but this train tunnel cake turned out so amazing that I just had to share!
My toddler spends a disturbing amount of time requesting to watch trains on TV, including episodes of Thomas & Friends and YouTube videos of trains coming out of tunnels. It’s clearly a stage that some 1 to 2-year-olds go through, my tot included.
So when my toddler recently celebrated his second birthday, I thought about making him a train-shaped cake just like the one that adorns the cover of the famed Women’s Weekly children’s birthday cakes book. But when I really thought about it, I realised that it’s not just trains that he likes – when we play with our toy train set, it’s trains going in and out of tunnels that he is most interested in. I just knew that a train tunnel cake was going to be more interesting to him that a train itself.
When I thought of the idea, I had a vision in my mind of what I wanted the train tunnel cake to look like, but I couldn’t really find anything like it on the internet from other makers of a kids train tunnel cake. Most others would do a circular cake with an alley cut through the centre, topped with another circular cake. It wasn’t exactly what I had in mind. I wanted it to be more like a tunnel, less like a cake with a tunnel cut through it. The closest inspiration I could find to match my vision was a rainbow-shaped cake with an arch in the middle, but even that wasn’t going to be able to fit a toy train on a track through it.
So, I decided to just make the train tunnel cake how I had envisioned it, with my fingers crossed that the construction would work.
Luckily, it did work! The train cruised through the centre of the cake with just enough clearance. Though there were a few hiccups along the way and things I would do differently if I were to make it again, but the cake did turn out exactly as I had imagined it! I would call it a success.
If you have a train-obsessed tot and would like to know how to make a train tunnel birthday cake, here are my instructions for creating an arched train tunnel cake covered with fun rainbow chocolate candy!
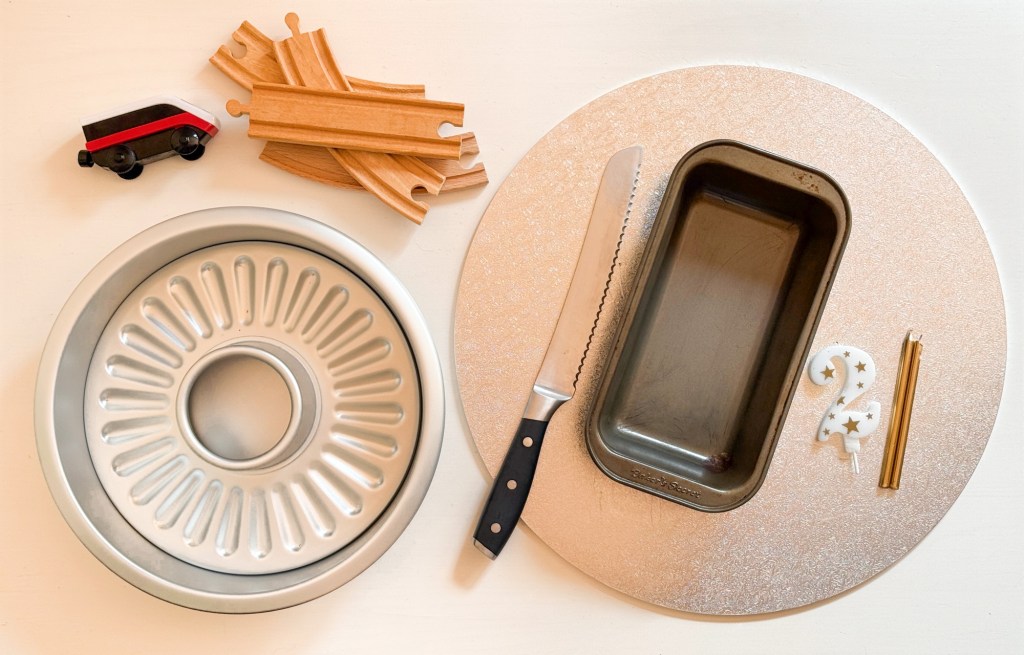
What you’ll need:
- Bundt cake tin, about 25 cm in diameter, ideally with a reasonably flat bottom (I got one from IKEA, which worked great)
- Rectangular loaf tin (I used an 11 cm x 21 cm tin)
- Cake board (must be a low height to accommodate the train tracks running over the edge of the cake board onto the table. I got mine from Spotlight and it’s about 5 mm tall)
- Train tracks (I used the wooden Brio-style ones, though other train tracks would probably also work)
- Battery-operated train (I purchased one from IKEA, which worked perfectly. Make sure any train you choose is not very tall as it has to fit through the low clearance inside of the cake tunnel)
- Birthday candles, to decorate
Cake ingredients:
- Chocolate cake recipe (I used this one from The Spruce Eats) x double recipe
- Chocolate buttercream icing/frosting (such as this one from BBC Food) x double recipe
- Coloured chocolate candy (such as M&Ms) for decorating, around 500g
Baking instructions:
Grease the bundt tin and loaf tin generously with butter.
Follow instructions to prepare cake recipe. Place 2/3 of the mixture in the prepared Bundt tin, and the other 1/3 in the prepared loaf tin.
Bake both cakes and allow to cool fully.
Make buttercream icing as per recipe.
Cake construction:
Place cake board in the freezer for 10-15 minutes.
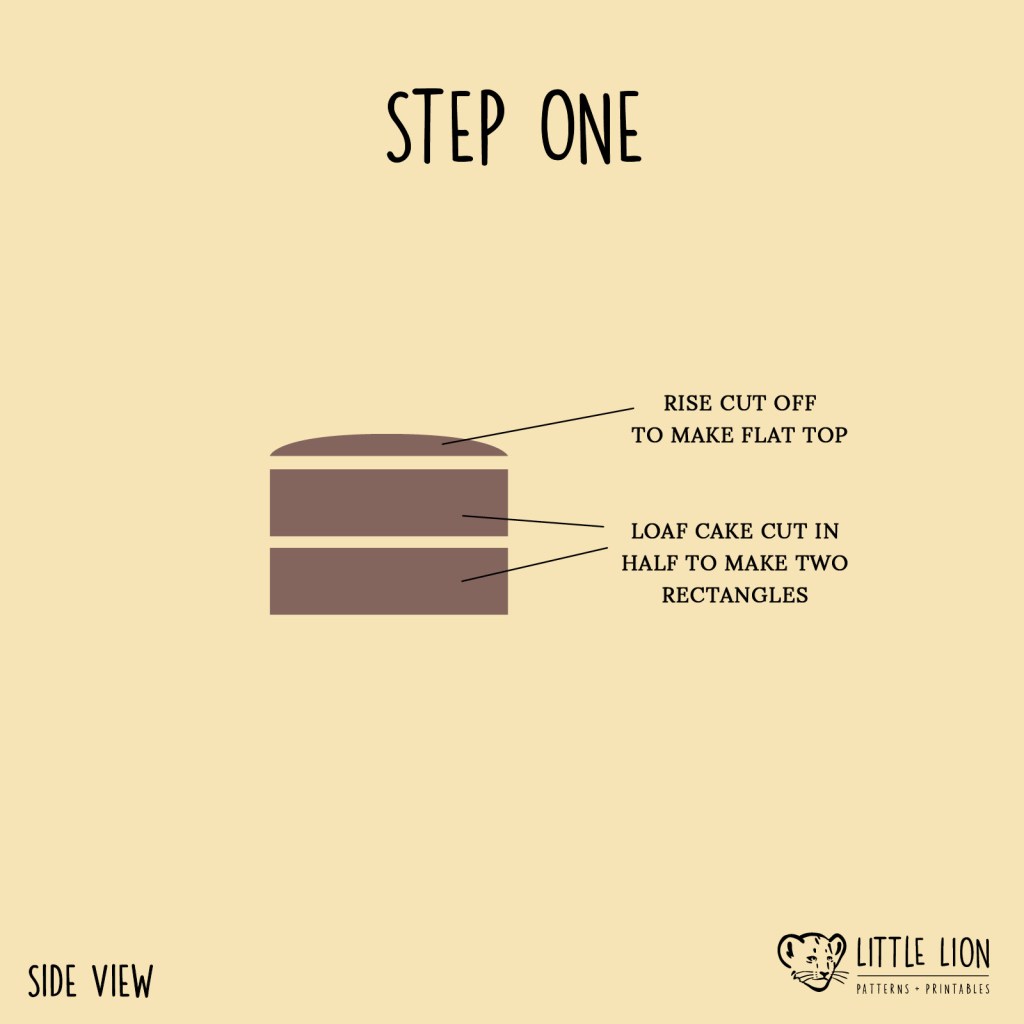
Trim the rise from the loaf cake so that the top is flat, then cut the cake in half horizontally. You will then have two large rectangles of equal height.
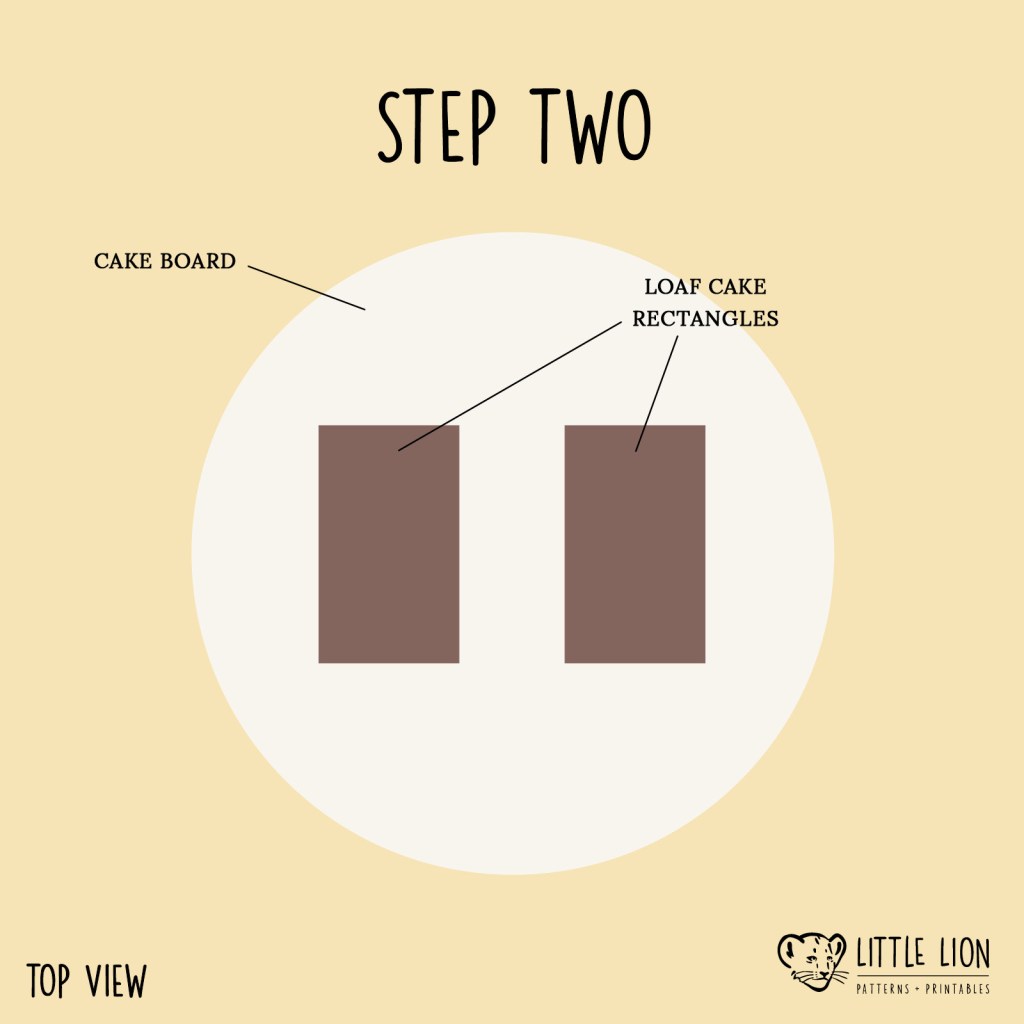
Remove cake board from freezer. Place the rectangle cakes on the cake board so that they are positioned to match the width of your Bundt cake arches. Use a thin layer of icing to secure the rectangle cakes to the cake board. The cold temperature of the board should ensure that the icing sets quickly, stopping your cake base from sliding around while you assemble the rest of the cake.
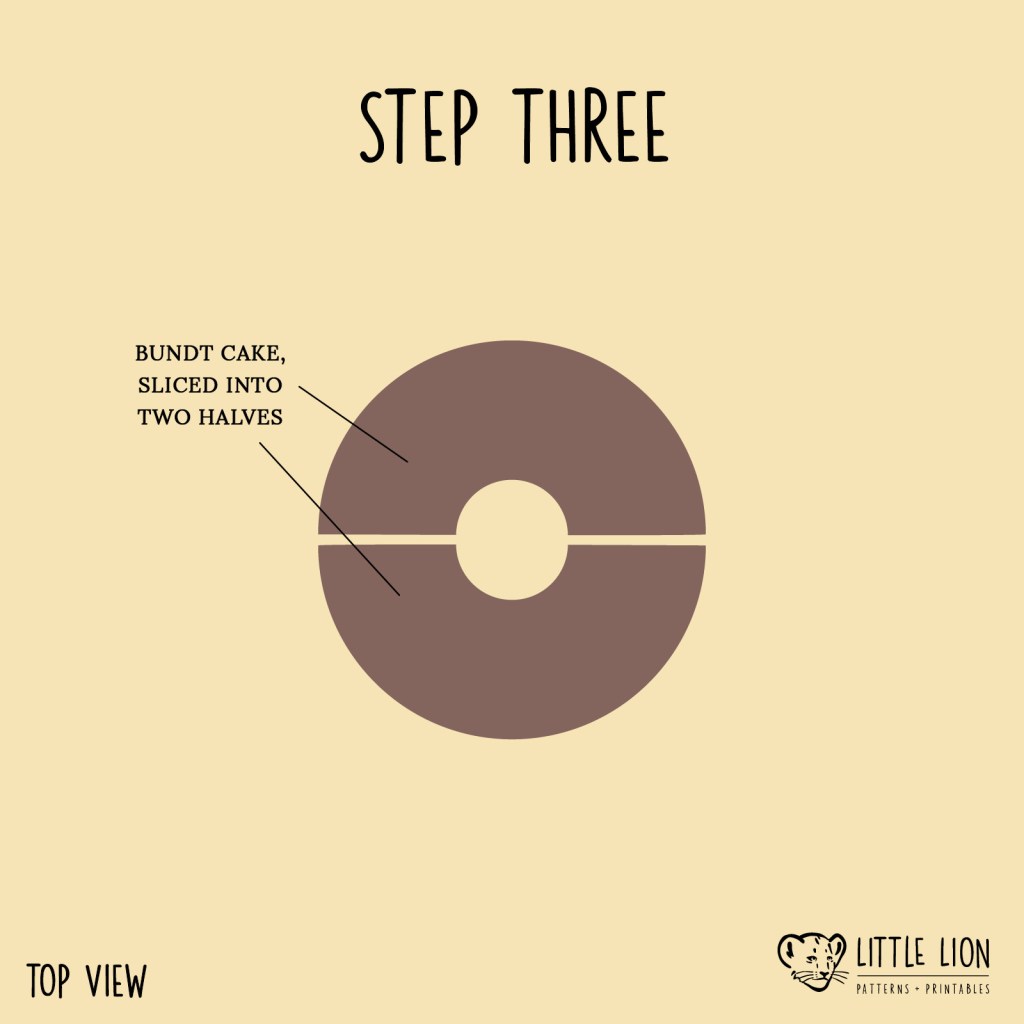
Cut Bundt cake in half through the center, so you will have two half circle arches with a rounded cut out in the middle.
Ice together the two half circle arches of bundt cake with the rounded sides facing out (so the flat sides are together). This will make one large arch with icing holding them together in the middle.
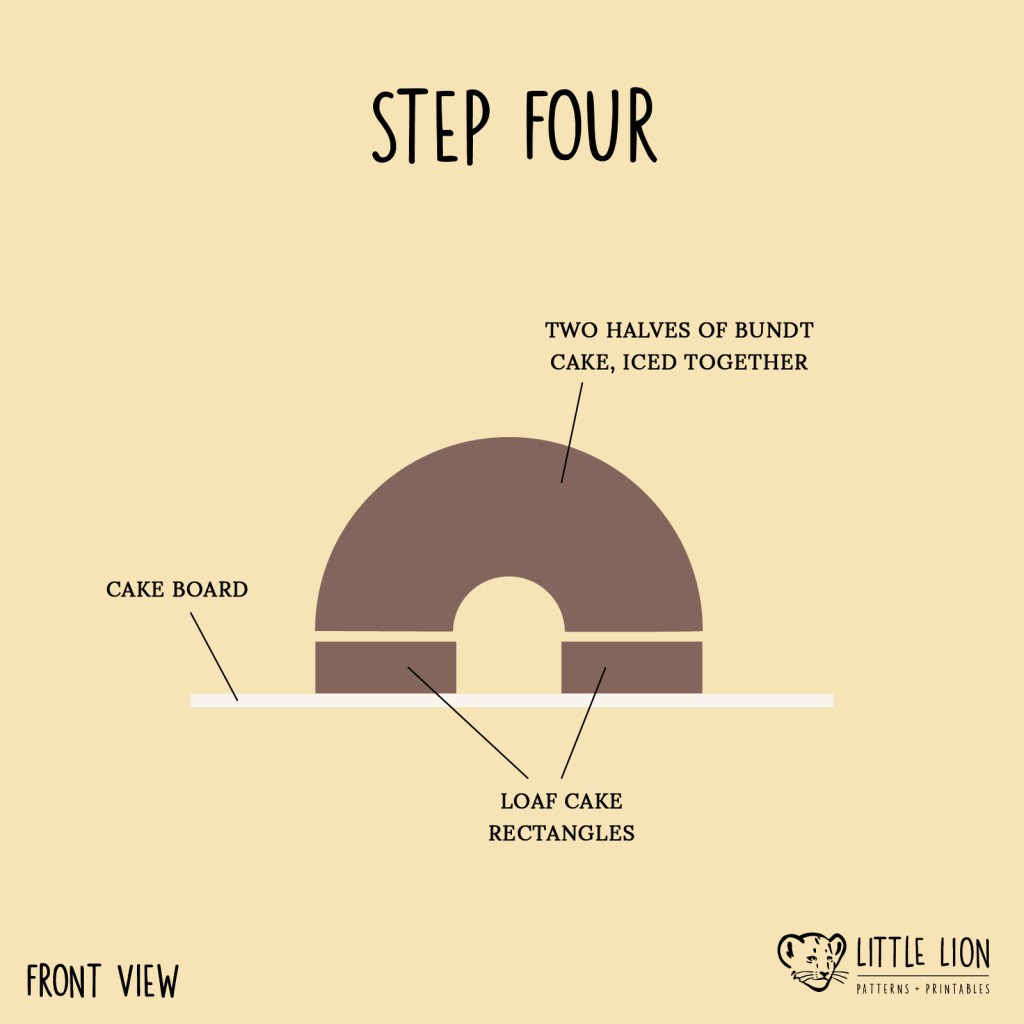
Ice the top of the two rectangle cake footings on the cake board, then place the large cake arch on top.
Use a bread knife to trim any excess cake from the cake footings, so that the shape matches the base of the arches. *I should note here that it does not matter if your cake does not have completely flat edges, or if it’s uneven on some sides – once it’s iced and decorated, you won’t notice imperfections!
Your cake should now be in the basic shape of a train tunnel. Quickly test whether your train will fit through the inner arch while on it’s train track – you may need to trim a little more space out of the arch with the bread knife if the inner arch is too small.
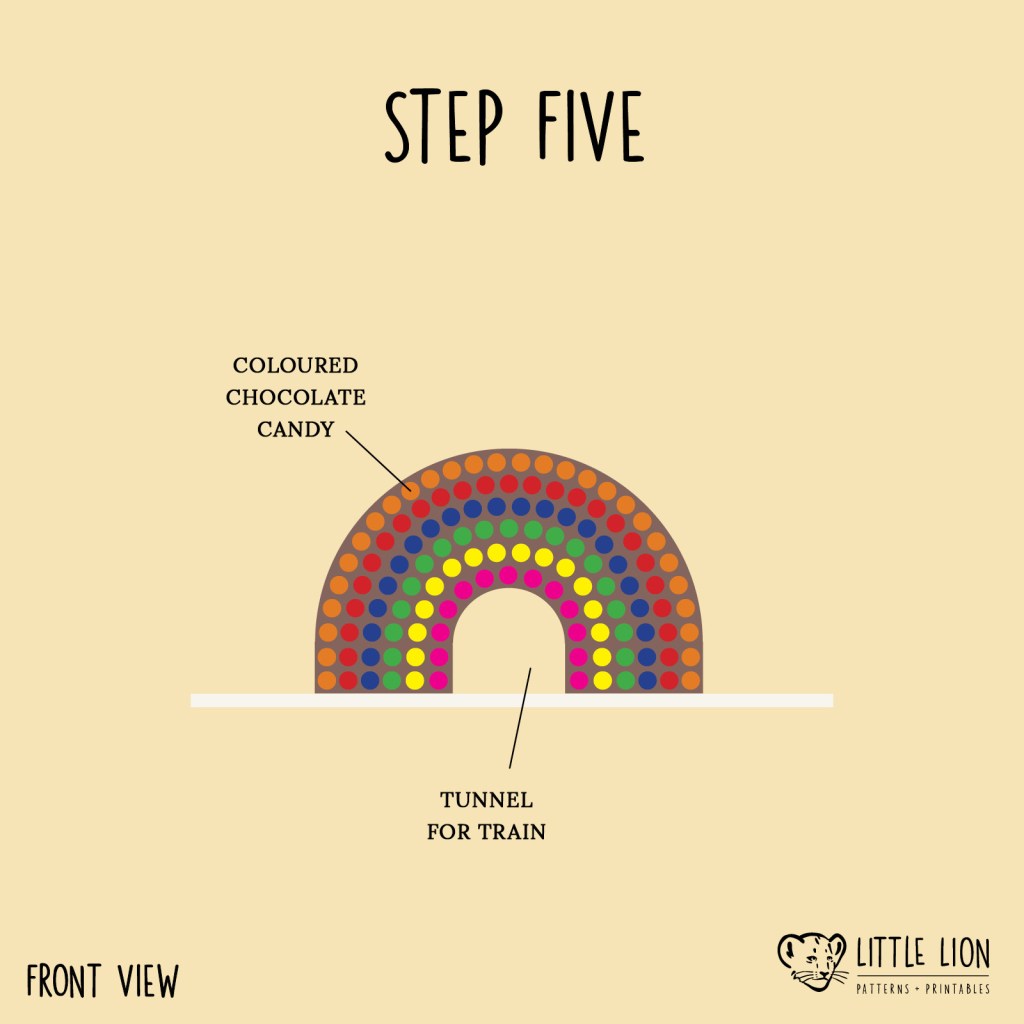
Use the remainder of the icing to cover all outside edges of the cake (I didn’t bother with icing the inside of the arch as you won’t really see that part).
While the icing is still soft, gently press in rows of coloured chocolate candy to match the arch shape on the outside of the cake.
Seeing as I was making my cake a day ahead, I placed it in the refrigerator to set the icing and make sure it stayed sturdy after construction. It did end up tilting a little to one side, which I think happened before I put it in the fridge as it was a hot summer day and the icing was quite soft, but that was ok – it wasn’t going to fall down and the tilt was barely noticeable.
Set up and serve:
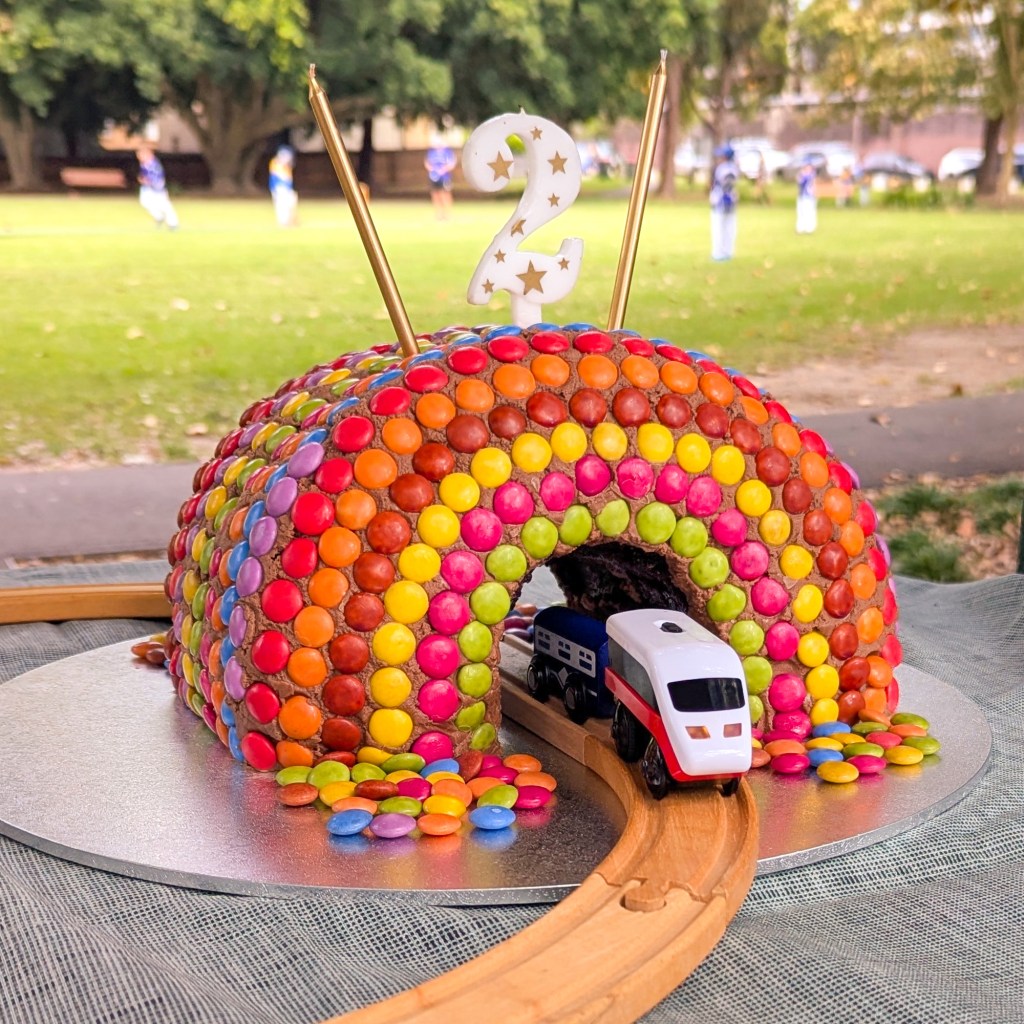
I set up the train tunnel cake on a picnic table in a public park, with the cake board at one edge of the table so that the cake was facing outward. A few extra chocolate candies went on to the cake board at the foot of the cake, just to add some extra colour and texture.
A straight piece of train track coming through the centre which then curved around to follow the edge of the table all the way around in a big loop. I used a few blobs of blu-tac underneath the train tracks to give them some lift and stability as they changed height between the cake board and the table.
We set up the battery-operated train to turn on when guests started arriving, then had it running the loop for a good 1.5 hours of party time before we sang Happy Birthday!
Cutting and serving the train tunnel cake did prove to be a slight challenge due to the shape, though my friend came up with the solution of cutting it in half down the middle, then laying each half down to continue slicing into individual serves.
We got so many compliments about this birthday cake from our friends and family at the party. Plus, the fact that we had a moving train winding it’s way around the snacks on the table made it such an interesting table display.
If you have a go at making this train tunnel cake, please do tell me how it goes by commenting below – I’d love to hear about your attempts!

Leave a comment